
IVR Designer Guide
Draw your call flow on a canvas: menus, time checks, transfers, voicemail and the AI Voice Agent.
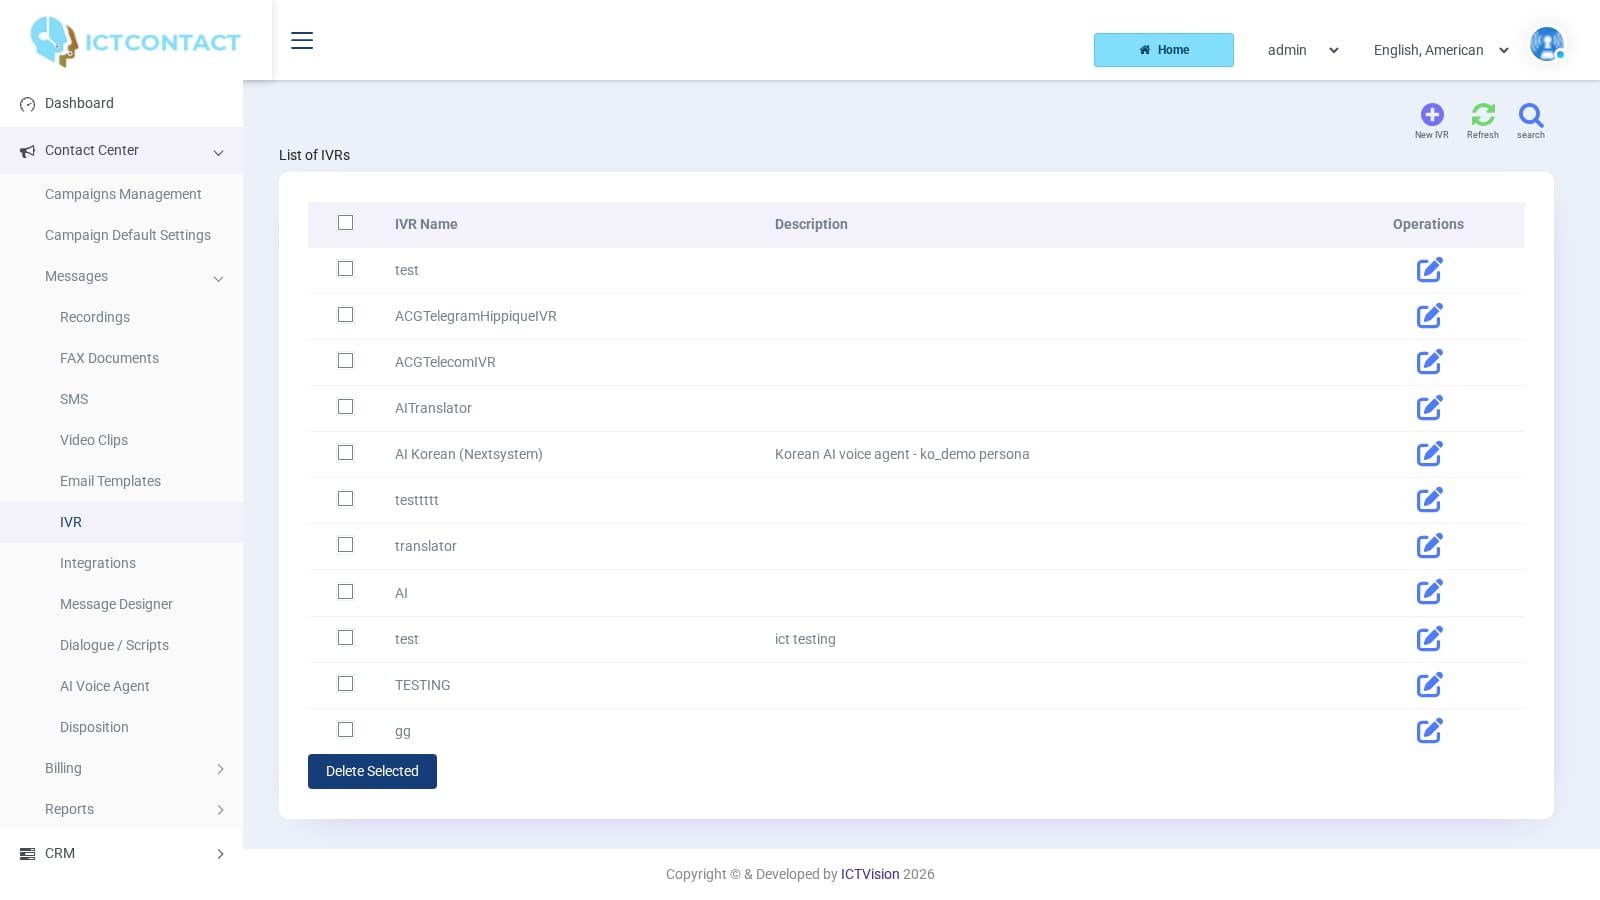
This is where you draw a call flow: answer the call, play a recording, offer a keypad menu, send the caller to an agent, hang up. What you end up with is a saved IVR. An IVR Campaign can dial out with it, or an inbound DID can land on it. Open it from Contact Center > Messages > IVR.
Prefer to watch? Tutorial 3: The IVR designer and inbound routing. The screens show the ICTContact name because ICTCRM runs on it.
The list shows IVR Name, Description and Operations (a pencil to edit). The top buttons are search, New IVR and Refresh. There's a Delete Selected button under the table.
The designer page
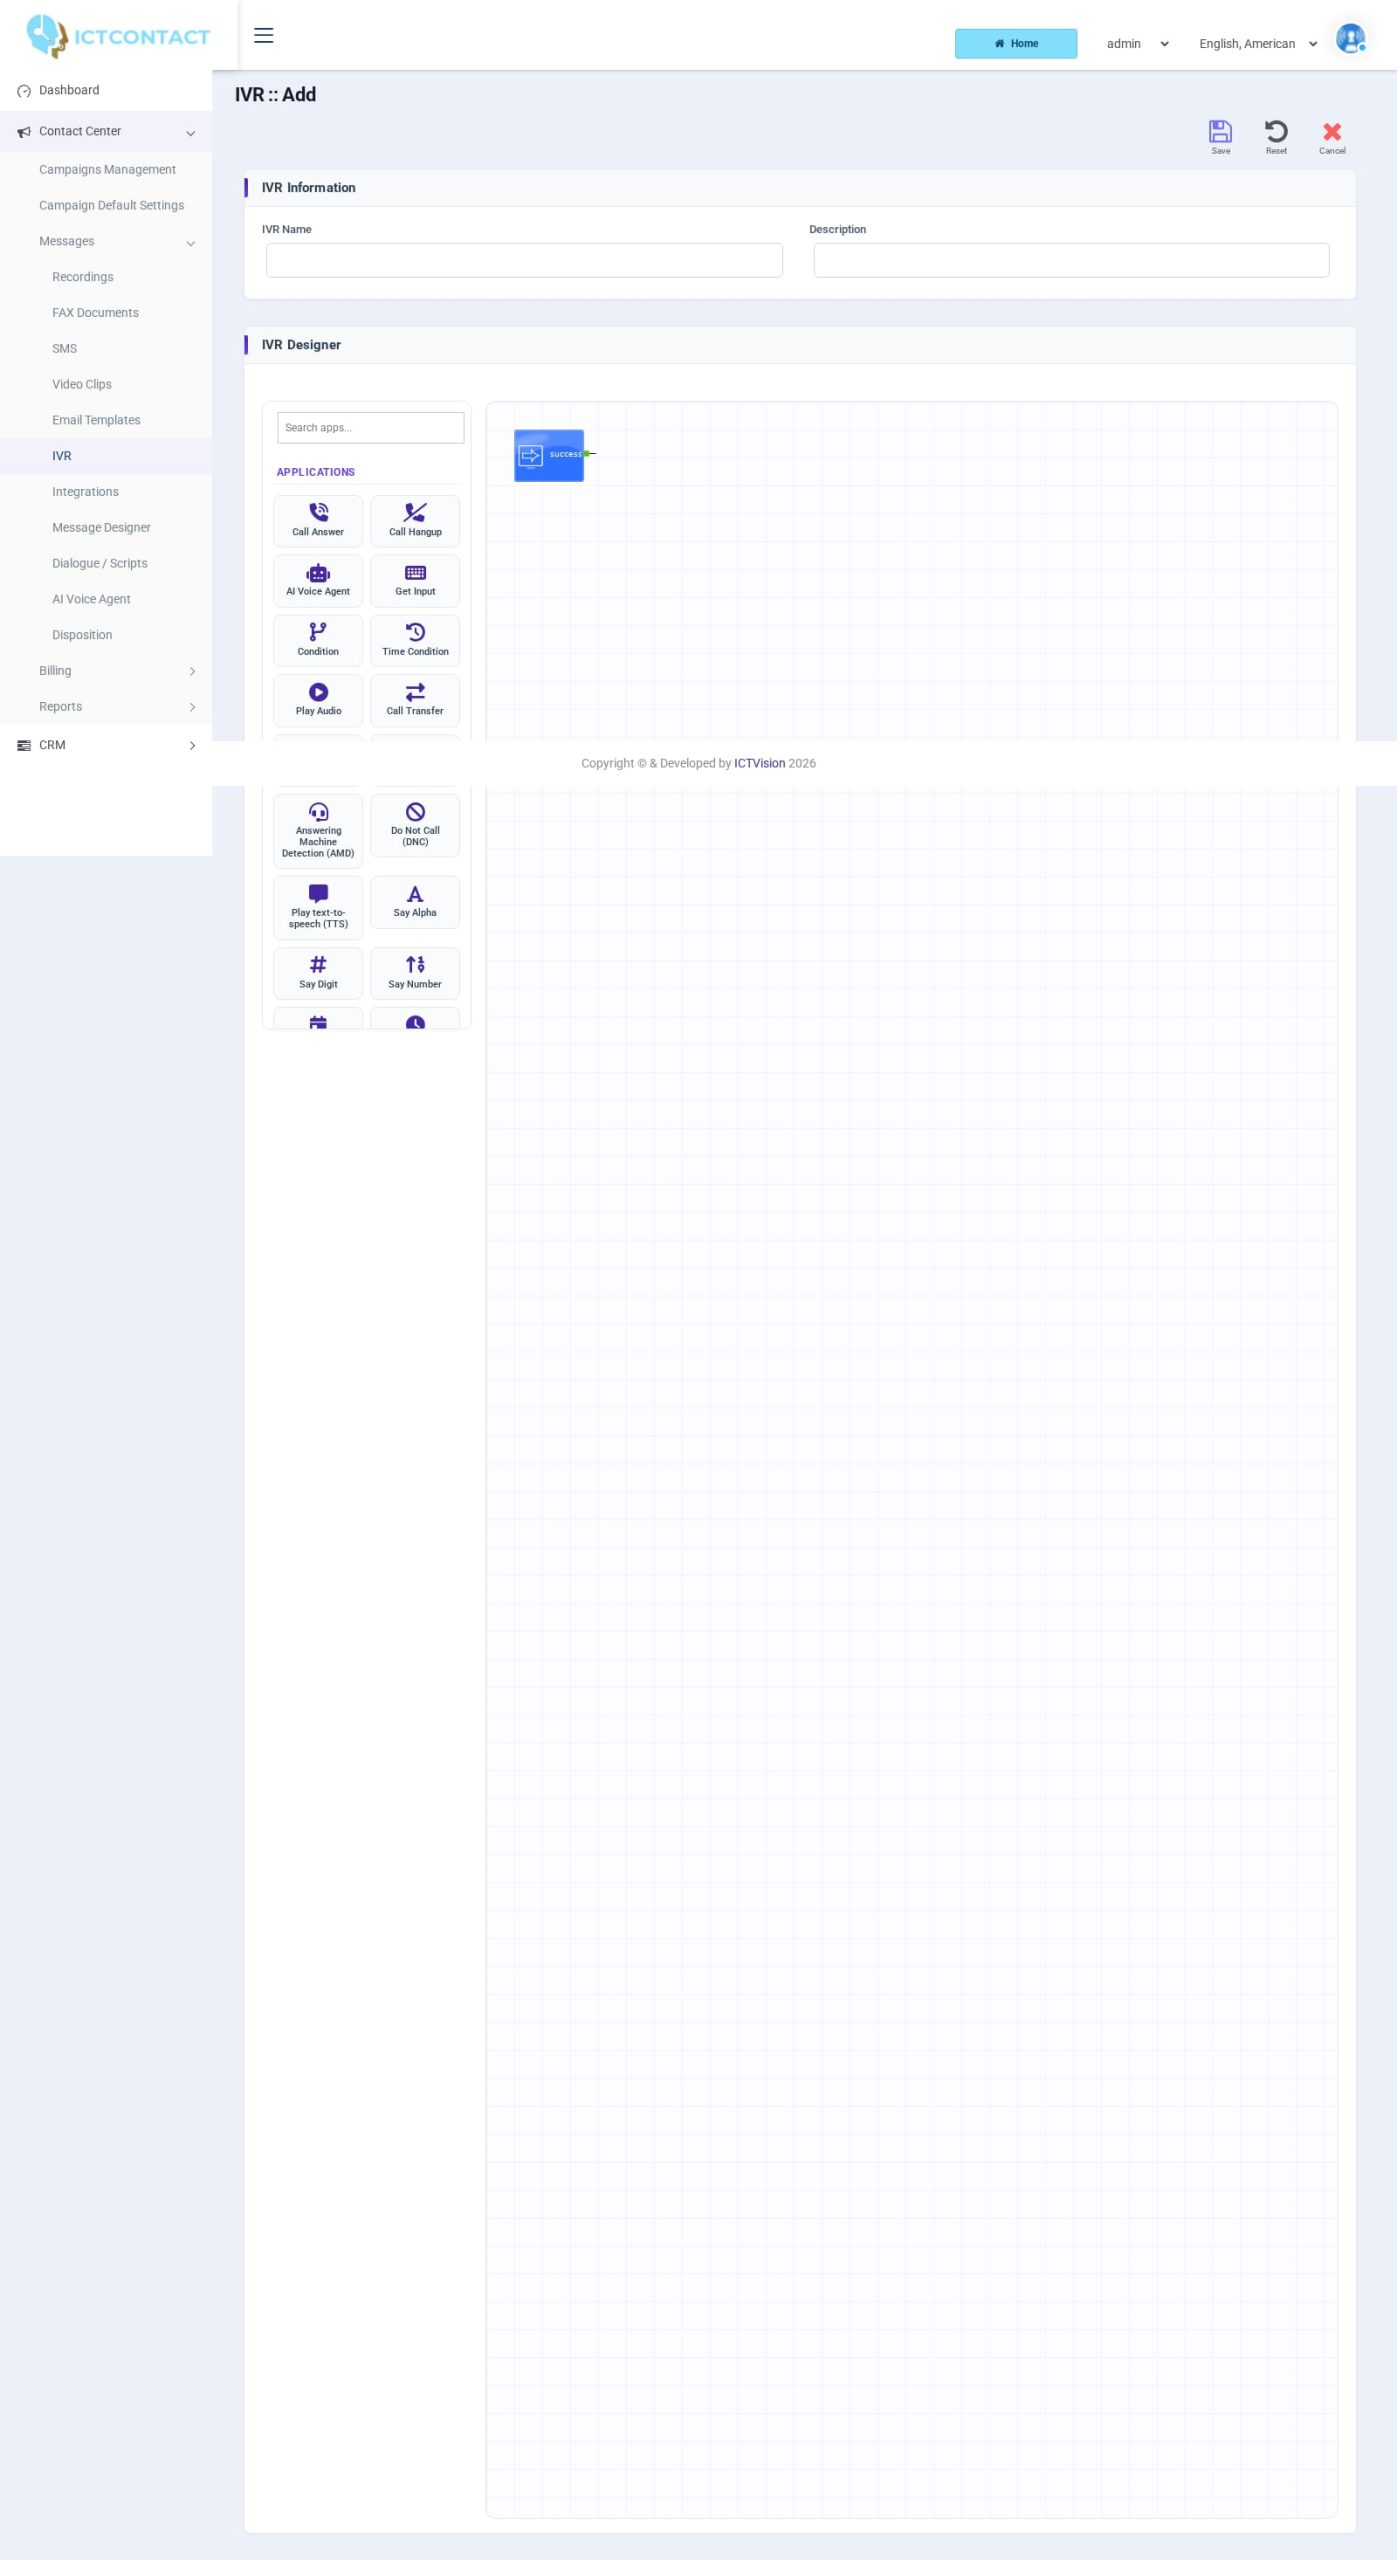
Click New IVR. The page has two parts:
- IVR Information: IVR Name (required, and it must be unique for your account) and Description.
- IVR Designer: a toolbox of application tiles on the left (with a "Search apps..." box above it) and a drawing canvas on the right. The canvas already has a Call Started node on it. You can't delete it. Every flow begins there.
Here's how you work on the canvas:
- Drag a tile from the toolbox and drop it on the canvas. Drop it inside the grid. If you drop it outside, nothing happens.
- Click a node to select it. You'll see a red border and a small x in the top left corner (remove). Nodes that have settings also get a pencil in the top right corner.
- Click the pencil. A dialog called "
properties" opens. Fill in the fields and click Apply (Cancel closes it without keeping your changes). Apply only stores the settings in the page. Nothing is written to the server yet. - Connect the nodes. Every node has a red square on its left edge (input) and one or more squares on its right edge. Each of those is labelled with an outcome, such as success, timeout, 1, 2, machine, human. Drag an outcome square and drop it on the picture of the next node. To break a link, drag the square back onto its own node.
- Drag the node picture itself to tidy the layout. The links follow.
- To remove a node, select it and click the x. The designer won't do it while any link is still attached ("Please remove links before deleting an Application"), so detach the links first.
- Click Save in the top bar. Reset reloads the last saved version, and Cancel takes you back to the list.
Any outcome you leave unconnected ends the call at that point. So connect the timeout and failure outputs too, even if it's only to a Call Hangup node.
Variables you can use
Get Input and Options Menu store what the caller pressed in a variable, [input1] to [input9]. Condition and the Say nodes can read those.
Most dialogs also offer the contact fields of the person being called: [contact:first_name], [contact:last_name], [contact:phone], [contact:email], [contact:address] and the custom fields [contact:custom1] to [contact:custom8]. There are eight custom fields by default, and your administrator may have renamed them. On an inbound call there's no contact record, so the contact tokens are empty.
The nodes
These are the tiles in the toolbox on this build. Where a node has a dialog, the fields are listed exactly as they appear.
Call Answer. Answers the call. The input is labelled "incoming call" and the output is labelled "Start". No settings.
Call Hangup. Ends the call. No settings.
AI Voice Agent. Hands the call to an AI persona that talks with the caller. Fields: Persona (active personas from Contact Center > Messages > AI Voice Agent) and Max Call Seconds (default 600). See the AI Voice Agent Guide for how to set up personas.
Get Input. Plays a prompt and collects a string of digits. Fields: Menu Message (a recording), Variable ([input1] to [input9]), Repeat Message ([Disabled], 1, 2 or 3 repeats on timeout or invalid entry), Wait for keypress (seconds, default 10), Min Length, Max Length, Invalid Message ([No Message] or a recording). Outputs: success, timeout.
Condition. Compares a variable with a value and branches on the result. Fields: Variable (an input variable, a contact field, or Enter Manually, which reveals Custom Variable), Operator (Equal, Not Equal, Smaller, Greater), Value (a contact field, or Enter Manually, which reveals Custom Value). Outputs: matched, unmatched.
Time Condition. Branches on the time of day and the weekday, in your account's timezone. Fields: From and To (HH:MM, defaults 00:00 and 23:59), Weekday (checkboxes Sunday to Saturday, with Monday to Friday ticked by default). Outputs: within, outside.
Play Audio. Plays one recording from Contact Center > Messages > Recordings. Field: Recording. One output.
Call Transfer. Sends the caller to an extension. Field: Transfer. It's a dropdown of your Agents / Extensions entries of type Agent / Device, External Call Center and Skill Group. Outputs: success, busy, noanswer, congestion, failed.
Call Record. Records the call from this point on. Field: Record, the maximum duration in seconds. 0 or a negative value removes the limit.
Options Menu. The keypad menu. Fields: Menu Message (recording), Repeat Message ([Disabled], 1, 2, 3), Wait for keypress (seconds, default 10), Invalid Message, Menu type (Normal menu or Menu with reports; most people leave it on Normal menu), Variable (where the pressed key is stored, [input1] by default). Outputs: one per key, 1 to 4 or 1 to 9 depending on the server setting (usually 1 to 9), plus 0 and timeout. Keys * and # aren't offered.
Answering Machine Detection (AMD). Listens to the start of the call and decides. No settings. Outputs: machine, human. It's only meaningful on outbound calls.
Do Not Call (DNC). Adds the number to the DNC list and carries on. No settings.
Play text-to-speech (TTS). Speaks typed text. Field: Text. It needs a speech engine installed on the server (Festival by default). If the node plays nothing, ask your administrator which engine is set up.
Say Alpha. Spells out characters one by one. Fields: Select variable (a contact field, or leave it on Enter Manually and type into Alpha Characters). Allowed characters: letters, digits, space and the symbols @ # $ * - + = / . and the exclamation mark.
Say Digit. Reads digits one at a time, "one two three". Fields: Select variable or Digits (0-9 only).
Say Number. Reads a number as a whole, "one hundred twenty three". Fields: Select variable or Numbers (0-9 and the dot).
Say Date. Speaks a date. Fields: Select variable or Date (a calendar picker, stored as mm-dd-yyyy). If you use a contact field here, it must hold the date in that same mm-dd-yyyy form.
Say Time. Speaks a time. Fields: Select variable or Time (hour and minute dropdowns, minutes in steps of 5). If you use a contact field here, it must hold HH:MM in 24-hour form.
Send DTMF. Sends keypad tones into the call. It's handy when you transfer into another phone system that needs an extension dialled. Fields: Select variable or Digits (0-9).
Add Delay. Waits before the next node. Field: Seconds (numbers only).
Set Caller ID. Changes the caller ID presented on a transfer. Fields: Select variable or CallerID (numbers only).
Integration API. Calls one of your Integrations (Contact Center > Messages > Integrations) at this point in the flow. Field: Integration.
Putting an IVR live
There are two ways to do it, and both go through a campaign.
Outbound, IVR Campaign.
- Go to Contact Center > Campaigns Management, click Add new and pick the IVR Campaign card.
- In the IVR Campaign Configuration step, choose your IVR in Select IVR. The Dialing Mode is fixed to Broadcasting for this type.
- The last step (labelled "Advacne Configuration" on screen) holds Max. Concurrent Channels, Max. Retries, Suggested dialing order, Max. Call Duration in seconds and Max.ring time in seconds.
The campaign dials each contact and, when they answer, runs your IVR from Call Started.
Inbound, DID. Create the same IVR Campaign, but set Contact List Closure to Wait Inbound in the Contact step. That campaign dials whatever's in the contact group (an empty group is fine) and then stays active, listening for calls.
- Start the campaign.
- Open the DID's forwarding page with the Forward DID icon on the DID list. The DID list isn't in the sidebar on the current build. The administrator assigns DIDs to your account from Client Management > Assign / Remove DIDs.
- Set Usage to Forward to Campaign and Campaign to that campaign.
The DID Forwarding form on this build only offers Forward to Extension and Forward to Campaign. There's no direct "IVR Menu" target. The campaign is the link. The Campaign dropdown only shows campaigns in state active, scheduled, stopped or pending.
The campaign's Caller ID and Max.ring time settings don't apply to inbound calls.
Worked example: a three option menu with after hours handling
Goal: callers press 1 for sales, 2 for support, 3 to hear opening hours. Outside working hours they hear a closed message.
Before you start, upload three recordings under Contact Center > Messages > Recordings: "welcome_menu" ("Press 1 for sales, 2 for support, 3 for opening hours"), "closed" and "hours". You'll also need one agent extension for sales and one for support under Administration > Agents / Extensions.
- Click New IVR and name it "main_menu".
- Drop Call Answer and connect Call Started to it.
- Drop Time Condition. In the pencil dialog set From 09:00, To 17:30 and tick Monday to Friday. Click Apply. Connect Call Answer, Start, to it.
- Drop Play Audio, open the pencil, set Recording to "closed" and click Apply. Connect the outside output of Time Condition to it. Drop Call Hangup and connect Play Audio to it.
- Drop Options Menu. In the pencil dialog set Menu Message "welcome_menu", Repeat Message 2, Wait for keypress 10, leave Invalid Message on [No Message], Menu type Normal menu, Variable [input1]. Click Apply. Connect the within output of Time Condition to it.
- Drop Call Transfer, open the pencil, set Transfer to the sales extension and click Apply. Connect output 1 of the menu to it. Do the same with a second Call Transfer for support on output 2.
- Drop a Play Audio with Recording "hours" on output 3. Then connect it back to the Options Menu input, so the caller goes back to the menu.
- Connect the timeout and 0 outputs of the menu, and the busy, noanswer, congestion and failed outputs of both transfers, to a Call Hangup (or to a Play Audio apology first).
- Click Save.
Now create the IVR Campaign (Wait Inbound for a DID, Conclude Campaign for an outbound run), start it, and call in.
An Options Menu can only branch on keys 1 to 9 and 0. If you need more choices than that, chain a second Options Menu behind one of the keys.
Stuck on something this guide does not cover? Open a support ticket or browse the other guides.
Try the live demoSee pricing